Here are the results for a recent game I played.

Green is first player moving towards the top. Blue is second player moving towards the bottom. For this game review we’re going to look at two concepts, Double Vertical Walls and Late Game Escaping, and then leave readers with a puzzle to solve on their own.
The game starts with the Standard Opening as both players march to the center. Green opens with a horizontal wall (e3h) and Blue responds with the Shiller opening (e8v). Green responds with an opposite side Shiller (d1v). Let’s pause here and assess the board.

The Shiller Opening is covered in our Intermediate Guide. This opening helps create more paths for your opponent while also creating a wall that your opponent can’t force you to move back around. Blue next move tries to block Green’s Shiller with a vertical wall (d4v) that will leave a frustrating gap in Green’s back court. Blue’s plan will be to trap his own pawn on the same side of a central vertical line as Green’s pawn, block the goal line on that side, and force Green back around the map. It is unlikely Blue will get all of the walls he needs placed, but this plan at forces Green to race against any horizontal walls Blue places.

Green can feel the pressure of his pawn being pushed to the right. His next move(f3v) accomplishes two things. First, it creates a block against Blue’s potential e4h, and second it sets Green up to close off his rear wall in one move if he needs to (e2h). Green can now keep the opening in his back court there, or block it at the last minute if Blue is trying to send him back around the map. This is a strong move by Green and soon it will completely foil Blue’s plan.

Blue’s response is the beginning of his trouble for the rest of this game. Blue plays a horizontal wall (f5h) to try and keep multiple path’s open for Green. A better move would have been shifting this wall one space to the left (e5h), boxing in Green with only one way out. Blue opted against this because Green would have been able to respond with a vertical e6v to separate the two pawns. Once separated Blue can’t force Green’s path as easily as if they are in the same territory.

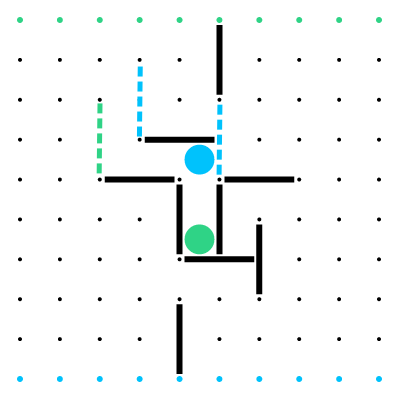
With Green’s next move we get to our first concept. Let’s show the board and then talk about what double vertical walls do for Green in this position.
Double Vertical Walls

With Green’s next move, the vertical e4v, Green is suddenly sitting in a very powerful position. The rest of the board aside, Green is between double vertical walls with his rear path blocked. This essentially gives him a free space heading towards his goal. It is true he has to spend a move taking this space, but he can put this move off for some time because it can’t be taken away from him.
Blue, on the other hand, has just had two of his walls turned against him. His early d4v blocked Green’s Shiller Opening, but now it is helping to build Green’s double verticals, and Blue’s f5h, which was supposed to create some momentum pushing Green to the right side of the board has been bypassed and is now pushing Green towards the goal. What’s worse is Blue’s pawn position. When Green does decide to move Blue will be forced to follow with a move or surrender a jump to Green. Blue’s best hope at this point is to try and turn Green around, but even this will be fruitless. Blue is one wall behind on the right side of the board, and with an easy 2 wall block for Green on the left, Blue has already lost the race on the left side as well.

Not matter what Blue decides to do next move, Green will still be leading the game and Blue will be forced to follow, and the free move from the double verticals for Green is looming in the near future. In one sense Green is two moves ahead. At this point things look pretty helpless for Blue.
Blue places a horizontal d6h and after Green’s next move (c5h) stops to weigh his options.
Late Game Escaping
The threats are everywhere. As mentioned above, no matter how Blue tries to use horizontal walls to turn Green around, Green will always be one step ahead, closing off which ever direction Blue chooses. On top of that, if Blue does try to create a horizontal passage, Green will have the added advantage of being able to place a vertical wall in many locations and control the direction Blue has to move.
Without many options Blue looks at Green’s huge threat of the vertical b6v. This wall reaches close to Green’s goal line. It is almost a given that if Blue does not block this wall then Green will play it. With this in mind Blue sees a two-step option that offers an escape.
First Blue will close the gap in his vertical line with e6v. This invites Green’s b6v as noted above, but Blue counters with what seems like a strange c7v, practically inviting Green to the goal line. The power in this two step move can be seen elsewhere on the board.
Because Green left the threat of either side of the board open earlier, and kept the opening in his back court, Blue’s closing of his central vertical line has indeed trapped Green in the same territory as Blue. If Blue manages to wall off his goal line on the left side of the board, then Green will be sent back around. Of course this wont happen without Green closing his back court off, but it does force Green to take a turn and a wall to make this play.
Green wisely closes off the other side of the board (note that he still leaves the gap open, keeping Blue’s path count at 2 instead of 1). Some may say he rushed this, as Blue still needs two moves in order to close off the left side goal line. Couldn’t Green have waited a turn and placed a better wall on the left side that lets him close the game out faster?

By closing the other side of the map Green forces Blue’s next move. Blue want’s to play a6v and extend the vertical wall that will push Green back down the board, but with the other side of the board closed Green can easily play c8h leaving an opening to win that Blue can’t block. If Green had not blocked the other side of the board control would have been ceded to Blue. With the wall count dwindling and the board being closed off, path count becomes very important. Here Green’s move saved him at least 2 spaces.

We can see after the next two moves that the path count should equal at 13. Notice, though, that blue doesn’t play a7v, and instead opts to block off the gap he originally crated by blocking Green’s Shiller opening. This is a clear blunder, but at this point Green still has enough time, walls, and empty space to close out the game either way.
Closing Puzzle
Let’s rewind to Green’s 10th move and pretend he didn’t block the other side of the map. We know Blue would jump at the vertical a6v and that after Green does close the other side of the board Blue would proceed as before. In this situation we have Green’s path count at 15 and Blue’s path count at 13. We know Blue’s next move will be to complete the vertical wall with a8v. It is Green’s turn.
What can Green do in one move this turn to completely foil Blue’s plan?

For those wondering I am the Blue pawn in this game (shame!).
Screen shots are from Vielen Games version of Quoridor on Android. Highly recommended!


